


When You Can't Find the Win

This post is pretty much guaranteed to be unpopular. To wit:
✅ Analysis of one position in excruciating detail
✅ Forcing you to think
✅ No clear conclusions
Screw it, we’re doing it anyway!
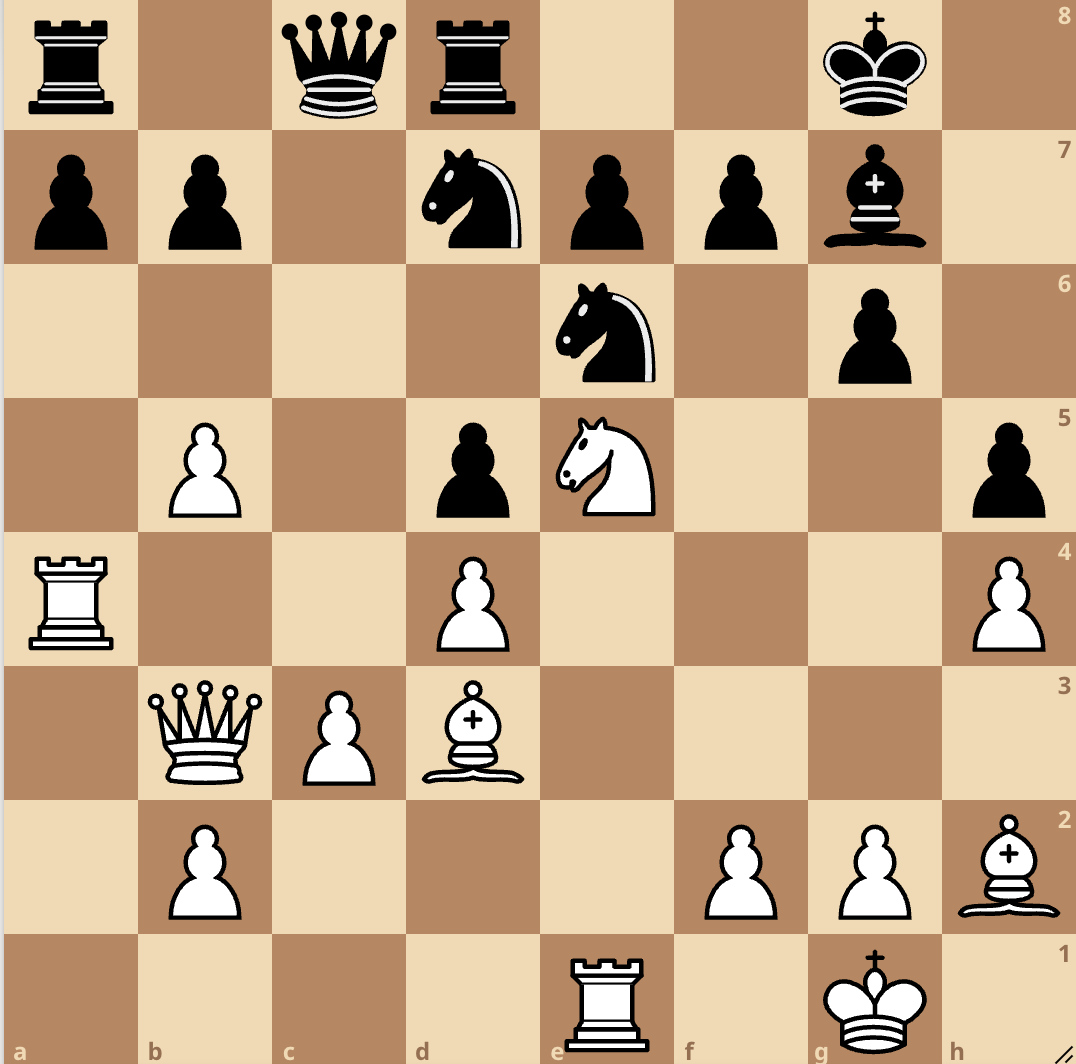
White to move.
As always, you’ll get more out of what follows if you first grapple with the position yourself, but if you’re a big baby who doesn’t care about chess improvement feel free to skip to the analysis below.
This position is from a rapid training game I played with 10 minutes plus a 5 second increment. When this position occurred I had 5 minutes left on the clock and my opponent had 1 minute, so if you want to match the game conditions as closely as possible, you can set a timer for 5 minutes and stop it when you decide on your move (presumably you would not want to use the whole 5 minutes). Or you could take a bit more time. Either way, make sure to do 2 things:
Measure your time.
Write down the move you decide on.
Okay, let’s get into the analysis. Clearly, White is doing well. All of our pieces are active and well-placed whereas Black’s are tangled up. The doubled pawn on b5 is an asset, cramping Black’s position, and opening up the a-file for our major pieces where they can pressure Black’s weak pawn on a7. Black’s whole setup on the kingside looks rickety and close to falling apart, especially the knight on e6, which is awkward and vulnerable. As a bonus we also have the bishop pair, which could come in handy later.
There are lots of appealing candidate moves and it looks like a direct win may be possible. Let’s start with an easy one: can we just take the undefended pawn on d5? No, that would run into Nxe5 with a discovered attack on our queen.
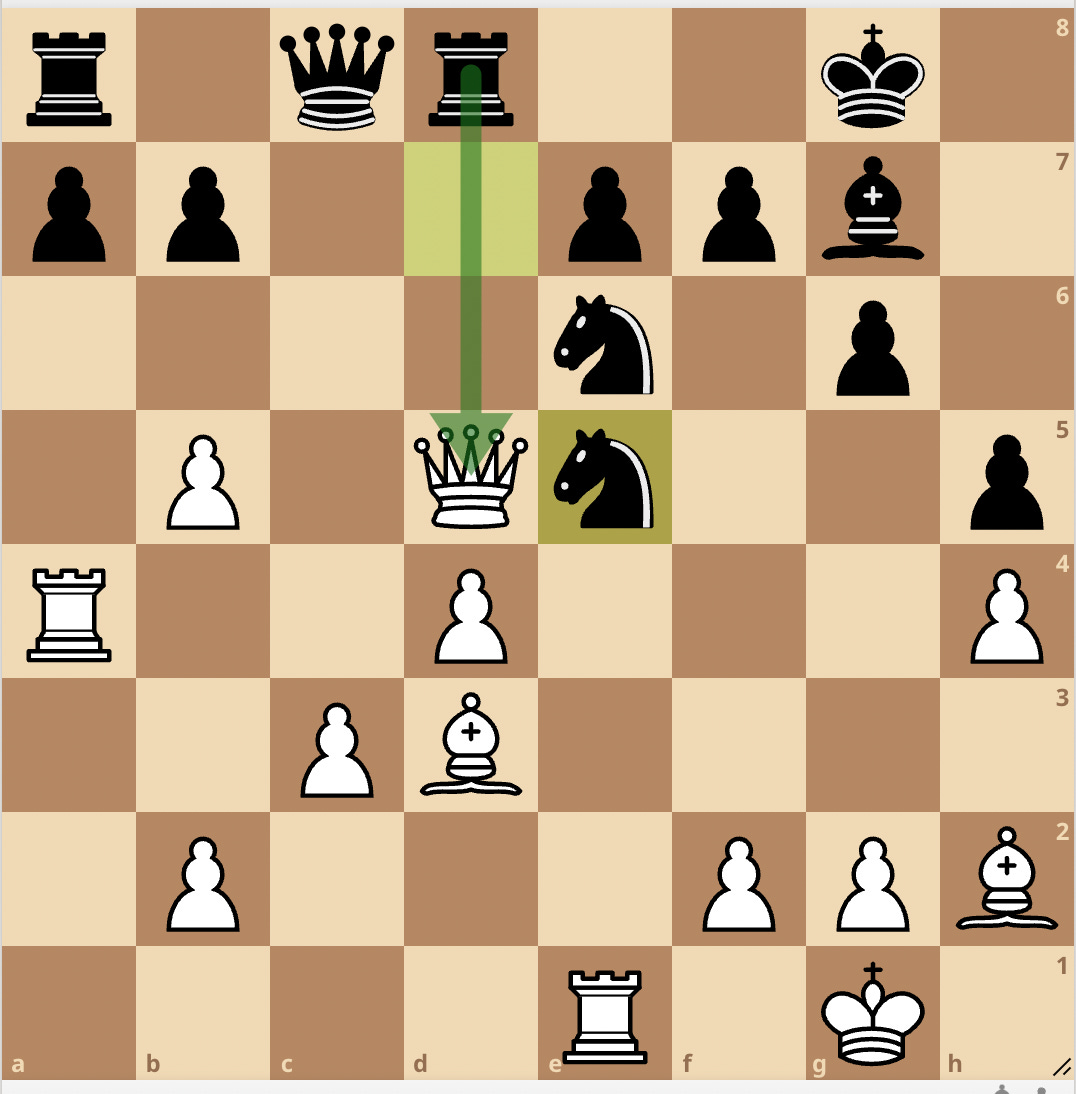
Qxd5 Nxe5
Now in general, in a position where it looks like I might have a direct win, I want to look at the most forcing and promising options first. For me those are Nxf7 and Nxg6. Both of these moves are looking to exploit Black’s weak king and vulnerable knight on e6. Both look quite forcing and promising, so we could start with either one. Let’s look at Nxf7 first.
Nxf7 Kxf7 21. Rxe6 Kxe6

After sacrificing the knight it seems logical to sacrifice an exchange on e6, dragging Black’s king further out into the center. At this point Black’s king looks quite vulnerable on e6, but we’ve already sacrificed a whole rook and it’s not obvious how to continue the attack. Should we keep working on this position or look for alternatives?
Now would be a good time to talk about how much time it makes sense to spend on this move. Remember, in the game I had 5 minutes left (plus a 5 second increment) while my opponent was down to 1 minute. When considering how long to look for a forcing win, it’s critical to consider how good your alternatives are. If your king is about to be checkmated on one side of the board and your only option is a counterattack on the other wing, you have to figure out how to make the attack work, using all your time if necessary.
In this case though our options are much better. We have lots of positional trumps and very good chances of winning in the long run without sacrificing anything. The opponent already being so low on time increases our chances in a long game even more. All of this points to two conclusions:
We shouldn’t spend too much time here. Probably not more than 1-2 minutes.
We shouldn’t go for a sacrifice unless it is clearly good.
For me, these factors would cause me to abandon this line here. It’s too risky (whole rook invested), too unclear, and there’s no need for me to go for it. That doesn’t mean the line is bad, just that it doesn’t feel like a practical choice. Extraordinary calculators or attackers might be able to make this line work. We’ll return to this position later. For now let’s consider another candidate.
Nxg6 fxg6 21. Rxe6

At first this seems to just win a pawn, but we should notice that Black has a resource here.
21…Nc5 22. dxc5 Qxe6

So we end up in a position where White has a pawn for an exchange. We do have some other stuff going for us: we damaged Black’s king position, our bishop pair is looking pretty good, as does our connected pawn mass on the queenside. If you notice the trick 23. Re4! taking advantage of the pin to deflect Black’s queen from the e-file, you might feel more optimistic. Still, we’re down material, and the evaluation of this position isn’t that obvious, to me anyway. I would reject this line for much the same reasons as the previous one - too risky and unclear when the current status quo favors me.
At this point we’ve basically dispensed with doing something so we’re on to doing nothing. But what’s the best way to do nothing? One option is 20. Qa3 with a double attack on a7 and e7, but this has the downside of allowing Black to trade a lot of pieces on e5. This is bad because White’s pieces are much better placed than Black’s, so we would prefer to keep more of them on the board.
That brings us to my favorite move in this position, 20. Nf3.

The more I look at this move the more I love it. White simply keeps all the long-term trumps in the position, avoids any trades, and prepares next to double on the a-file. There’s not really much Black can do about this. The challenge is to play a retreating move in a position where it looked like you should have a direct win. For most players this is really hard to do. Playing Nf3 - especially playing it quickly - is an ultra classy decision.
Finally, let’s take another look at the position after
Nxf7 Kxf7 21. Rxe6 Kxe6


With computer assistance it turns out this position is also really good for White. One good move is 22. Bxg6, cutting off the Black king. Then after 22…Nb6 I would be very worried because I’m down a rook, my other rook is attacked, and Black’s king is threatening to run back to d7. Meanwhile it’s not obvious how to continue the attack.

However, the computer sees that after 23. Qc2, threatening mate on f5, White is still doing well. I think this is nearly impossible to understand during the game, but maybe some players with very strong attacking instincts will be able to sense this should work.
Finally, there’s a spectacular tactical solution starting with 22. Rc4!!? taking advantage of Black’s queen being trapped.

Then there could be a forcing line leading to mate.
22... dxc4 23. Bxc4+ Kf6 24. Bf7 Bh6 25. Qe6+ Kg7 26. Qxg6+ Kf8 27. Qg8#
This is an awesome line, but beyond the ability of almost anyone to calculate, especially given the time constraint. Also, Black could have bailed out with a queen sacrifice.
23…Qxc4 24. Qxc4+ Kf6

In this position Black is actually up material with two rooks and a knight against a queen. With the queen against Black’s exposed king I can see that White is doing well despite the material deficit, but it’s not that clear to me that White is doing any better than in the relatively simple and stable position we started from. For that reason, even if you spot 22. Rc4, it’s not that clear that you should go for this.
Let’s try to wrap all of this up. What’s the “right” solution to this position? Or, given that most of White’s reasonable moves are good, what’s the wrong solution? The biggest way you can go wrong in this position, apart from making an outright blunder, is to spend too much time. Additionally (and related) you might become unsettled and lose confidence.
If this happened to you, don’t worry too much, it’s a position where there’s a very high risk for it. That’s kind of the point. I spent 2.5 of my 5 minutes and played Qa3, not a terrible move, but definitely not the best move. I ended up drawing the game after missing some chances later. This is a pretty bad result - given White’s advantage on the board and the clock to start with, we should be aiming to win this game almost all the time.
I’ve found this is a very common kind of turning point in winning positions. Everything is going great and you feel like it’s time for the knockout blow, only you can’t quite find it. You spend a lot of time looking, end up playing something random, and it goes downhill from there. For me this kind of turning point seems, if anything, more common than blowing a great position with an outright blunder.
In this kind of situation I was really influenced by a game I saw Fabiano Caruana play in the US Championship a few years ago. Fabi had built up a winning position with White and the engine was starting to point out winning lines. On the live stream, the commentators were getting pretty agitated as one win after another passed by. Fabi, however, seemed unbothered. He was playing logical moves and playing quickly. While his moves weren’t the best according to the computer, they also didn’t let go of the advantage. A few moves later his opponent made another mistake, allowing him to win in a very boring and straightforward way.
The thing that was really memorable about the game wasn’t whether he did or didn’t find a particular winning line. It was that he didn’t seem especially bothered about finding a clean win, as long as he could keep the pressure on his opponent. This is the ideal way to play a position with a persistent advantage. Quickly and crisply check the forcing lines. If you don’t find a win, accept the results of your analysis. Don’t burn time trying to make it work, just make a good move that keeps the pressure on.
Easier said than done!
Good practical advice. Thanks. It reminds me of a few years ago, playing evening league games (60m+30s), when I was usually getting down to increments quickly and a colleague (about 2500) suggested I just 'play good moves' (ie keep improving and retain advantages) instead of trying to calculate to the end. A bit of both is required if course but I manage my time better now.
This reminds me of this unfamous commentary on the World Championship 2021 where Vishy said "That's My Boy" after Magnus played the move he suggested (Nc6). All the other GM commentators didn't understand, but Vishy still got it.
https://youtu.be/lWVemqLJkSk
Do you remember who Fabi played against in the US championship when he built up that winning position? Is it the one against Shankland in 2017?